Monday, September 30, 2013

Tips for Monster Marijuana Growth

Next Level Marijuana Growth


Marijuana Growth

Achieving large marijuana growth can take some practice, however, follow our tips and you will be growing monster marijuana plants in no time!


If you’ve ever wondered what some growers do to get their monster yields, you’re in luck. Today we’ll go over two of the surprisingly simple tricks you can use to maximize the yield from your marijuana growth, whether you’re a seasoned grower or a first-time amateur.


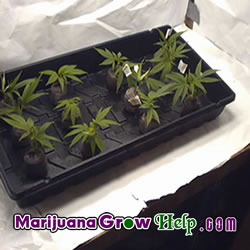
The first tip for achieving some extra monstrous marijuana growth in your cannabis grow requires a touch of patience, as you’ll be lengthening your grow time a bit to achieve the best results. Other than being a bit more patient, though, this is a very simple, easy and practically free method of maximizing your cannabis yield. To start with, you’ll grow your seedlings or clones through their regular vegetative phase with no special changes; just plant them and let them veg for 6 – 8 weeks or however long you usually would.


Now, when you’re plants are 6 – 8 weeks into veg, or about 8 – 12 inches tall, you can induce flowering. Change the light cycles and start giving your plants 12 hours light, 12 hours dark, but don’t adjust their nutrient blend too drastically. After 2 – 3 weeks in the flowering stage, switch your plants back to your vegetative light cycle. It will take 1 – 2 weeks for them to fully kick back into vegetative growth, but once they do the growth will take off.


Let your plants vegetate for another 4 – 6 weeks, then commence flowering as you usually would and watch your little monsters explode into bud. This whole process will extend your grow time by 4 – 6 weeks, potentially longer depending on how long you choose to keep the plants in each stage of growth.


Marijuana Growth

Controlling large marijuana growth properly is very important.


Super Cropping for Large Marijuana Growth


Another popular method among some growers is the practice of super-cropping. This method is a bit brutal, and is part of a class of high stress training techniques (HST) that rely on damaging your plants while they are growing in order to take advantage of their resilience and healing capabilities. By comparison, there are low stress training techniques (LST) that many growers use to achieve similar results without the harsh damage to the plants, but that is a topic for another article.


To use super-cropping as a method on your plants, you’ll want to start with healthy vegetating plants. Don’t try to super-crop a plant that is ill, afflicted with disease, nutritionally deficient or infested with bugs; all those factors stress your plants, so preforming something like the HST super-cropping technique at that time will only slow your plant’s growth, and might even kill it.


So start with healthy plants in the vigorous stage of their growth; don’t try super-cropping just a week or two before you intend to flower. Your plants should have several sets of healthy branches; the limbs you choose for super-cropping should still be fairly new, green growth that is reasonably soft as opposed to older growth that is harder and woodier in texture.


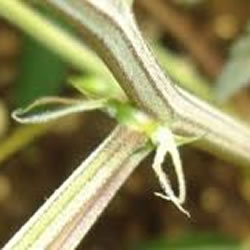
Identify the main cola or colas of your plant, and choose the one(s) you intend to super-crop. If there is only one main cola, then you will want to super-crop it near the top of its growth, where the main limb is still relatively new and soft. Now grasp the limb you wish to super-crop firmly between your thumb and forefingers.


The trick here is to apply enough pressure to crush the stem slightly, and while continuing to apply this pressure evenly you will gently bend and twist the limb. When possible, bend or twist your limb in the direction that you wish to have the plant grow.


Wait until your hear a small pop or feel a break in the inner stem, and then gently release and leave the limb bend in the direction you desire the growth to go. If you damage the outer skin of the limb too much during this process, use a piece of duct tape to bandage the wound and support the plant for 1 – 2 weeks while it heals the super-cropped area.


The advantages of super-cropping include a smaller, more compact and bushier plant, which is ideal for indoor growing or that stealth closet grow you have. Super-cropping also allows you to develop more branches, with more light, thus yielding more bud.


Tips for Monster Marijuana Growth

Friday, September 27, 2013

Fact & Fiction: Debunking Common Marijuana Grow Myths

Common Marijuana Grow Myths


The Grow Myth: Stressing your plants during flowering, either by withdrawing nutrients, changing the lighting cycle, subjecting them to cold or frost-inducing temperatures, or forcing them through prolonged dry spells will increase their resin production.


The Facts: When you subject your plants to unnecessary stresses during their flowering period, you actually cause more harm than good; stressing your plants slows down their rate of growth and can even turn susceptible females into hermaphrodites with male-style flowers. These types of unnecessary stress factors can also damage the cannabinoids already produced by the buds. Remember that your cannabis plants are living organisms, so the more hospitable you make their environment; the more they will thrive and reward you with a bountiful harvest.


The Myth: Harvesting during the night cycle, or giving your plants 24 – 72 hours of total darkness just before giving them the chop, will increase the potency of your herb.


The Facts: Although many growers do harvest during the night cycle and some growers put their plants in the dark for a few days before harvest, no measurable difference has been found between plants harvested during the day, at night or after 24+ hours darkness.


Determining Legitimacy of Grow Myths


This grow myth has been rather pervasive, due in part to two legitimate factors: the hormones that induce flowering in the cannabis plant and production of resin are activated at night, and THC and other cannabinoids are known to suffer from photo-degradation, i.e. light causes them to break down. When you consider the amount of time that cannabis spends flowering (usually 50 – 60 days or longer) though, it makes more sense that a couple of days (or nights, in this case) is not going to make a huge difference in the level of resin or associated cannabinoids in your crop.


The Myth: Using the pollen from the flowers produced by hermaphrodite plants to fertilize other females will allow you to harvest fully feminized seeds.


The Facts: Whenever a hermaphrodite shows up in your crop, you should actually cut it down for the sake of maintaining the genetics of the rest of your plants. While some breeders use the pollen from these hermaphroditic females to pollinate other plants and produce so-called feminized seed, the reality is that you don’t want plants with hermaphrodite genes in your crop if you can help it. Plants with the genes to turn hermaphrodite are less resistant to stress, including bugs, mold, nutrient deficiencies or overloads and generally poor growing conditions.


In short, a plant turning hermaphrodite is a sign of weak genetics, and you certainly don’t want to purposefully pass those genetics on to your future crop. Reputable seed banks will sell seeds that re known to be ‘stabilized’, meaning that the seeds are from plants that are three, four, five or more generations descended from the original plants. These seeds comes from parent plants that have been shown to reliably produce similar results; while isn’t not impossible to get a plant that turns hermaphrodite from a reputable seed bank, the chances are very slim.


Fact & Fiction: Debunking Common Marijuana Grow Myths

Friday, September 20, 2013

What is a Clone & Why is Cloning a Good Skill to Have?

Learning the Proper Way to CloneLeaning to Clone


Cloning is a popular method of propagating cannabis; it allows you to ensure a higher degree of quality control and predictability when raising your crop, as well as allowing you to bypass the lengthy process of growing from seed. Although seed is a good way to start a grow initially, the process of germination and growth from seed, including the weeding out of unwanted male plants, hermaphrodites and weak females makes growing a cannabis clone an attractive alternative.


In addition to being able to cultivate a crop of entirely-female plants, cloning will ensure a uniformity of growth among your plants, so you can expect to harvest similar quantities and potency of medicine from each plant grown in the same conditions. After all the other factors in your grow are taken into consideration, the quality and quantity of cannabis that your plants will yield largely comes down to genetics.


With cloning, once you’ve identified a female plant with robust, healthy growth and high resin / THC production, you can keep her alive and propagate genetically-identical clones from her for years to come. Timing the growth cycles and harvesting time of your crop, adjusting your nutrient blend to be perfectly suited to the needs of your specific strain, and maintaining perfect light, heat and humidity levels is all made easier when you grow a uniform crop of clones.


Perhaps most importantly, whether you choose to grow from clones regularly or not, being able to clone your plants is an immensely useful skill to have simply because it allows for asexual reproduction. So long as you know how to clone your plants, you won’t be totally reliant upon seeds or having access to pollen from a male plant in order to continue your crop. In this way, someone with only one or two female plants can still propagate a new crop and continue to grow and harvest their crop successfully, practically indefinitely.


Leaning to Clone

There are very few downsides to cloning, and it is widely practiced by growers.


Downsides of Choosing to Clone


One of the few downsides to cloning is the resultant lack of genetic diversity among your crop. Not only might you get bored of smoking the same strain of bud all the time, but if a disease, mold, infection or pest gets into your grow and afflicts your plants, it can quickly spread to all the plants in your grow. To mitigate this factor, choose a mother plant that has demonstrated hardiness, resiliency and resistance to mold, infection, pests and other growing hazards.


To further avoid the potential of infecting or infesting your grow, be sure to sterilize and clean all the equipment you use (especially if you reuse equipment between grows), and try to wash your hands before entering your grow room or handling your plants.


What is a Clone & Why is Cloning a Good Skill to Have?

Cutting and Preparing a Pot Clone

Learning Basic Pot Clone Techniques


Pot Clone

Understanding how to properly cut and manage a pot clone can result in higher cloning success rates.


Proper harvesting and preparation of your cuttings is important to ensure successful rooting, and while there is no substitution for the hands-on experience you’ll get as a grower, there are some tips and suggestions you can follow to increase the survival rate of your new pot clones. To start with, you’ll select a healthy, robust female and take your cuttings during her vegetative cycle.


If you have several females and you aren’t sure which one you ultimately want to keep as a mother, then take a few clones from each female before putting them in to flower. Label the clones, and once you’ve flowered and harvested the mothers you can choose whether to keep or trash the clones you took from each plant accordingly.


Cuttings for cloning can be taken during regular pruning; you’ll want to target lower branches and growth that is still green, relatively new and between 4 – 6 inches long. Some growers will take larger cuttings of 8 – 10 inches, but without a rootstock to support the extra growth, larger clippings may take longer to root or simply die from lack of nutrients. Softer, newer growth is easier to clone than harder, woodier growth; take your cuttings just below a node on the limb.


Use a sterile razor blade or very sharp scissors / pruning shears to take your cutting, making a 45-degree or diagonal cut. Many growers make another cut underwater before actually rooting their cuttings, so if you plan on making a second cut, the angle of your first cut is less important.


When you take your cuttings for new clones, try to process them (trim, scrape and dip them in rooting hormone as you see fit) as fast as possible; the sooner your cuttings are put in their cloning tray or rock wool cubes, the more likely you are to get healthy root growth. Cutting your stems at a 45-degree or diagonal angle will expose more of the inner bark, known as the xylem and the cambium, to the rooting hormone and growing medium.


Pot Clone

There are many tips and tricks to increase the success rate at which growers successfully cut pot clones.


Additional Important Information


It’s important to expose the xylem and cambium because that is where the stem cells that will grow new roots are located. In softer, greener cuttings a simple diagonal cut will generally expose enough of this inner bark to produce roots.


If you’re having trouble getting a strain to clone or if you’re cloning with cuttings that are harder or woodier in texture, you can scrape the outer bark away with a razor blade (or a fingernail in some cases) for about ½ an inch around the base of your cutting. This will expose more of the xylem and inner bark, giving your clone more surface area to produce roots.


When you’re taking a lot of cuttings all at once, or you don’t have time to finish processing your cuttings the day you take them, store them in a bucket or vase of water with a light nutrient solution (use about 1/5th of your normal nutrient solution) and an air stone to keep them fresh. Storing your cuttings this way will prevent them from wilting due to dehydration, as well as help to avoid the chance of a lethal air bubble forming in the stem.


Cutting and Preparing a Pot Clone

Wednesday, September 18, 2013

Rooting Your Clones: A Review of Rooting Mediums

Understanding Rooting Mediums


Rooting Mediums

Rooting Mediums can vary widely, it is important to do research and understand the different types.


The best rooting mediums for your clones may differ slightly based on your experience, your own preferences as a grower, and your environment (think about whether you’re growing in Washington state or British Columbia vs. growing in Arizona or New Mexico).


Budget and what your end goal are may also impact your decision of rooting medium. Most growers stick with the tried and true, preferring the reliability of rock wool, starter trays or peat pots, while others champion bubble buckets and deep water culture (DWC) hydroponic systems.


If you’re just starting out, or you’re looking for more information about different rooting mediums for your clones, here’s a review of the most popular cloning mediums.


  1. Rock wool cubes: these are an affordable rooting medium (generally you can get a hundred rock wool cubes for about $10 – $15) that can be coupled with a cheap tray to provide an affordable, reliable rooting medium for your cannabis clones. Aside from being cheap, rock wool cubes also reduce the need for aeration or water stones, and as long as you leave the cubes in ~ ¼ – ½ inch of nutrient solution and water they will continue to uptake water as needed, so they won’t dry out.

  2. Peat moss pots: the two chief problems with peat moss pots are that they dry out very easily, which results in the death of your new clones due to their fragile roots being unable to take the dehydration, and peat moss can be susceptible to mold and rot. Peat

    Rooting Mediums

    Various rooting mediums require different nutrients and care.


    moss is also prone to lowering the pH of your nutrient solution, so you may need to adjust your nutrients and pH slightly to account for this affect. Those issues aside, peat moss can be a great rooting medium and is both cheap and widely available.


  3. Soil in starter trays: tried and true, this method has been used for decades and with strains that root more easily it is often enough to just take your cutting and immediately plant it in moist soil. Keep your soil from drying out, but don’t waterlog your plants when you start in soil; overwatering can cause rot and suffocation. To maintain good drainage you can mix your topsoil with perlite or vermiculite (wear a mask for this).

  4. Aeroponic systems: you can build your own aeroponic system with anywhere from $15 – $50 of supplies, or you can purchase a premade aeroponic system such as the EZ Cloner system (~ $280) for up to 60 clones. For growers interested in a more economical aeroponic system, the Nutriculture PT100 (~ $100) is a smaller system designed for up to 20 clones. Aeroponic systems are generally renowned for exceptional results, producing roots on 90 – 100% of clones, and are especially good for cloning tougher strains.


For a novice grower, first-time cloner or the cannabis cultivator on a budget, rock wool and a nutrient tray are an affordable and generally quite reliable method of growing your first clones.


Rooting Your Clones: A Review of Rooting Mediums

How to Care for Your Marijuana Clones

Marijuana Clones and How to Care for Them


Marijuana Clones

It is very important to understand how to care for your marijuana clones.


Caring for your marijuana clones is easy once you’ve had a bit of practice, and some strains are so easy to clone that you can practically set them and forget them. But as a general rule of thumb, here are some of the basic guidelines for taking care of your plants and ensuring the best survival rates for your new clones.


  1. Prevention is worth a pound of cure, so protect your clones from the potential of disease, mold or a bug infestation by sterilizing your cloning area and tools before use. You can use a water and bleach combination (10 parts water for one part bleach) to wipe down and sterilize the walls, tabletop or other area that you are growing in. Also use sterile tools for cutting your clones, so as to avoid the possibility of infection at the cut-site.

  2. Work fast so that your clones go from being on your mother plant to dipped in their rooting hormone and plugged into the rock wool cubes or other growing medium with as little down time in between as possible.

  3. Keep the temperature stable, generally between 75 – 80 degrees Fahrenheit. Fluctuations and extremes in temperature will stress your new clones and can kill them.

  4. Maintain humidity levels of approximately 75 – 95%, especially during the early days of rooting your new clones; if the growing medium dries out too much you risk damaging or killing the fragile new roots your clone is growing.

  5. Use a heating pad beneath your plug tray or the tray holding your rock wool cubes to ensure that the new roots are kept warm; new roots thrive in warmer environments, so if you have a heating pad under the tray but the rest of the room is only 70 degrees, you can still achieve good results rooting your new clones.

  6. Reduce the amount of foliage your new clones have to support; without a root system, it is hard for your cuttings to focus energy and nutrients on photosynthesis and you want them to be focused on developing new roots anyway, so remove or trim any large fan leaves on your cutting. Smaller leaves may remain, so don’t strip your cutting to a twig.


Marijuana Clones

Marijuana clones are important in increasing the efficiency of your grow operation.


Other Considerations


Follow these basic recommendations and keep your plants under cool fluorescents or low-wattage MH or HPS lights, and you should have healthy clones with roots in 1 – 2 weeks. Some strains are harder to clone, or slower, but if you don’t see any roots by ~ 3 weeks, you may have a problem. Cuttings that haven’t rooted after 3 weeks or more are unlikely to become viable clones, so you’ll have to take new cuttings and start over if that happens.


How to Care for Your Marijuana Clones

Monday, September 16, 2013

Cloning Sativa vs. Cloning Indica

Cloning Sativa vs. Cloning Indica


Cloning Sativa vs. Cloning Indica

Learn the difference in cloning sativa vs. cloning indica


When cloning cannabis plants, the process for cloning sativa and indica (or even c. ruderalis, actually, though cloning ruderalis isn’t all that common) is identical, but results


vary from breeder to breeder and from strain to strain. Your growing medium (soil, clay pellets, rock wool, etc.) as well as your rooting hormone, choice of lights and general growing environment all have a bit impact on your success rates with cloning, but genetics also play a role.


Most c. sativa strains and sativa-dominant hybrids are renowned among breeders for their ease of cloning. Indeed, many strains will take to the soil or rock wool and nutrient combination to form new roots without even using a rooting hormone, but there are always those strains that seem to resist cloning at great length.


For some growers, c. indica strains and indica-dominant hybrids prove more challenging to root. With that said, most indica strains are still reasonably easy to clone, even if you can’t just throw them in some wet dirt to grow roots like some sativa strains are apt to do.


Cloning Sativa vs. Cloning Indica

There are a few differences when cloning sativa and cloning indica


Rooting Times When Cloning Sativa vs. Cloning Indica


Rooting times for each strain vary as well, especially among hybrid strains, but clones from sativa plants may root more quickly than clones from indica plants, on average. There are a lot of factors that influence rooting time, not least of which is the skill of the grower, but many growers have seen root growth on sativa (and some indica) strains as early as 4 – 5 days after cutting, with roots developed enough for planning by 11 – 13 days after cutting.


As a general rule of thumb, when properly handled you can expect to see new roots forming on your clones within 12 – 16 days from initial cutting. Some strains may start to pop out after 20 days, but when you get much more beyond 3 weeks (21 days from cutting), the viability of your cuttings is hugely deteriorated and it’s probably best to take new cuttings and start over.


For c. sativa and sativa-dominant strains, many growers will put clones into their flowering cycle as soon as they’ve grown enough roots to be planted. Rushing into the flowering cycle with sativa strains is particularly advisable for anyone growing indoors or within a small greenhouse, as sativa strains can easily double their size, triple it or more during their flowering stage.


Cloning Sativa vs. Cloning Indica

Quick Tips for Cloning Difficult Marijuana Strains

Cloning Difficult Marijuana Strains


Cloning Difficult Marijuana Strains

Cloning Difficult Marijuana Strains can be made a little easier with some basic knowledge.


If you have a marijuana strains that simply won’t take root, or you’re encountering an overwhelming failure with your current methods of cloning, here are a few ways to increase your chances of success:


  • The potato graft: when you are trying to root particularly stubborn clones or cuttings taken from woodier, harder parts of a mother plant, and other methods have failed you can try a potato graft. To use a potato graft, simply select a potato that has started to sprout, you’ll want a smaller potato with 3 – 5 eyes on it. Cut a small hole about 1 – 1 ½ inches into the potato; you’ll prepare your cutting just like normal, dip it in your rooting gel or powder, and then fit it snugly into the hole in the potato. Now plant the clone and potato as you normally would; the potato will provide moisture and nutrients, protecting your clone and fostering the growth of new roots. You can also fill the hole in the potato with extra rooting gel prior to fitting the cutting into it.


  • Aeroponic cloning: if you have the DIY skills and a small budget, you can build your own aeroponic cloning system with basic supplies for anywhere from $15 – $50. Alternatively, systems that root between 20 – 30 or more clones at a time are available for a range of prices, including the EZ Clone systems for 30, 60 or 120 clones at a time and smaller 30-clone setups like the Turbo KloneT24 and Clone King systems. Bubbler buckets, designed for use with a single plant, can also be adapted for use in rooting anywhere from 4 – 8 clones at a time. Using rooting gel in conjunction with an aeroponic system can often yield roots in as little as 6 – 8 days from cutting.


If you’ve been cloning for a while, or you know what you’re doing but can’t figure out what is causing recent failures with your technique, do a standard check of your nutrients, your pH balance, the temperature of your cloning area and your humidity levels. And to avoid losing your clones to disease, rot or other infections, be sure to sterilize all of your equipment before and/or between uses, especially the razor blade you use to cut your clones from the mother.


Quick Tips for Cloning Difficult Marijuana Strains

Friday, September 13, 2013

Air Bubble Embolism:What it is and how to avoid it

Air Bubble Embolism


Air Bubble Embolism

Air Bubble Embolism is one thing that can lead to sickly, yellowing marijuana plants.


An air bubble embolism, also commonly called an air bubble aneurism, is what happens when you’re cloning your plant and an air bubble enters the stem of your cutting. This is particularly apt to happen when you use older, duller scissors or clippers, so using a new, sharp razor blade to take your cuttings is always more preferable.


An air bubble in your stem is deadly to the would-be clone because it blocks the transfer of fluid and nutrients in the plant’s cardiovascular system. To avoid the risk of drawing an air bubble into your stem, here are some tips for taking and preparing your cuttings for cloning:


  • Work quickly: prepare your cloning medium, rooting hormone and other materials ahead of time to ensure that you can process your cuttings in the shortest time possible from the time you take them off the mother plant to the time you put them into their rock wool, peat moss, plug tray, etc.


  • Use sharpened tools, preferably new razor blades that are sterile, to ensure a smooth, clean cut; the goal is not to damage the inner bark, including the xylem and the cambium, as much as possible (dull tools cause more crushing of the stem, thus more damage).


  • Do use rooting gel; the gel provides a liquid barrier on the stem / wound of your cutting, as well as containing hormones that encourage faster rooting.


  • Make another cut: after you’ve harvested your cuttings, make another cut about ¼ – ½ of an inch higher than your original cut while holding the stem underwater. This will ensure that the stem will draw up water rather than a lethal air bubble.


Finally, if you’re taking a large number of cuttings all at once, or if you won’t be able to deal with preparing them and setting them up to root immediately, fill a bucket or vase with water and a light dose of nutrients; toss in an air stone or two and keep your cuttings in this water / nutrient blend until you have time to deal with them properly.


Air Bubble Embolism:What it is and how to avoid it

Maintaining Your Marijuana Mother Plant

The Importance of Maintaining Your Mother Plant


Mother Plant

Keeping a mother plant for producing clones is a great practice.


A properly tended mother plant can successfully be kept alive for years, with many plants easily lasting 3 – 5 years and some legendary mothers that are claimed to have lived 15 – 20 years. And while keeping a plant alive for 20 years might be beyond the desire, and skills, of the average grower, a female who yields viable cuttings for cloning is nice to have and can be maintained for 3 – 5 years fairly easily.


Good mother plants are worth their weight in gold, as it were, and they offer many benefits. First and foremost is that you can cultivate a uniform, female crop in less time than it would take you to grow from seed and sort out the males, hermaphrodites and weak females that come with it. Second is that you’ll know what to expect from your crop on account of already having grown the mother plant.


To select a good mother plant, choose your strongest female with the best yield. Make sure that she isn’t afflicted by disease, bugs, nutrient problems or any other common grow problems, and set her up in your vegetative area for full-time vegetative growth.


A mother kept for clones can be kept under standard metal halide or high pressure sodium lights, but if you aren’t harvesting as many clones and you don’t want to constantly be trimming your plant, you can also leave established mothers under weaker fluorescent lights with good results.


Mother Plant

Keeping your mother plant healthy ensures healthy clones for a long time.


Keep Your Mother Plant Healthy


To keep your mother plant in tip top shape (and remember, as the source of your clones and thus your future crops, your mother plant is a central pillar supporting your entire grow operation, so you really do want to treat her well) be sure to trim away any spent foliage or dead growth. Don’t let yellow, dying or brown and drying leaves linger on your mother.


Don’t sentence your mother plant to the edges of your grow room, either, where she’ll be neglected and may fall prey to temperature fluctuations, mold and bugs. Dedicate a comfortable grow space for your mother plant, allotting her sufficient light, and be sure to keep any particularly photosensitive strains (meaning those that kick into flowering easily) under an 18 hour a day lighting schedule to ensure that she doesn’t go to flower.


When growing your mother in a pot or soil medium, be sure to keep an eye on your root ball. Despite the trimming and pruning you carry out up top, the root ball continues to grow and your plant can become root bound, leading to sluggish growth and sometimes outright death.


As you take cuttings and clones from your mother plant, you can expect that she will grow more densely and bushier. To keep her in check and avoid having your mother plant grow out of control, prune regularly even when you aren’t taking cuttings for clones. If your mother plant starts to get really unmanageable after a few years of growth, you can retire her by taking one of the strongest clones as a new mother plant.


Maintaining Your Marijuana Mother Plant

Wednesday, September 11, 2013

How Not to Clone: Cloning Mistakes to Avoid

Common Cloning Mistakes and How to Avoid Them


Cloning Tips

Follow our cloning tips to clone marijuana the right way.


Some cannabis strains are so easily cloned that you can practically take a cutting, stick it in the dirt and leave it to grow roots. While it may take a little more effort than that with most cannabis strains, cloning can still be a fairly easy, reasonably painless process. Here are some of the most common cloning mistakes made by growers new to cloning:


  1. Don’t clone from a flowering female: although it’s possible to take clones from a female who is in flower, the process takes longer and your success rate with the initial rooting process may be lower. The best plants to take clones from are females who are in the full, vigorous swing of their vegetative stage of growth.


  2. Don’t take clones from ill or otherwise afflicted plants: this really should go without saying, but your success in cloning will depend largely on the health of the plant you are taking cuttings from. If you take cuttings from plants that are infected, infested with bugs, or afflicted by mold or root rot, your cuttings won’t thrive as much as they could / should.


  3. Don’t drown your new clones: it’s true that drying out spells death for new clones and the fragile roots they’re (hopefully!) growing, but resist the temptation to overdo it lest they become waterlogged. Your plants need oxygen, just like all living creatures, and stagnant water becomes stale, lacking the oxygen your plants need. Over-watering your new clones can also need to root or stem rot.


  4. Don’t forget a humidity dome: new cannabis clones thrive in high humidity environments, so aim to keep humidity levels between 75 – 100%. If you’re growing / cloning in a particularly dry environment, or if you just don’t want to turn your whole grow room into a steam room, a humidity dome can be bought or made very cheaply.


  5. Don’t over-light your cloning area: when you first take your clones, remember that you don’t want them focused on photosynthesizing, you want them to focus on growing new roots. So keep your clones under cool fluorescent lights during the rooting period; once they are well-rooted you can plant them and transition them to MH or HPS lights.


  6. Don’t let it get too cold: new cuttings and freshly-rooted clones are very sensitive to the temperature of your grow area, so be sure to keep it warm. Ideal temperature should stay in a range of 75 – 80 degrees Fahrenheit.


Follow these simple tips the next time you take your clones and you’ll be well on your way to successful, hassle-free cloning for all your cannabis needs.


How Not to Clone: Cloning Mistakes to Avoid

Monday, September 9, 2013

Aeroponic Systems and Marijuana

Aeroponic Systems


Aeroponic Systems

Aeroponic systems allow growers to produce great marijuana with quick turnover.


Whether you’re looking for a more reliable system for use in cloning your cannabis crop, or you’re interested in producing the maximum number of clones possible, aeroponic systems are a great resource for the serious grower. Aeroponic systems are especially useful when you want to root clones from a strain that doesn’t usually respond well to traditional cloning methods. Properly managed, most aeroponic systems require little or no oversight after initial setup, and they can produce viable roots in as little as 6 – 8 days.


One of the best aeroponic systems available, and admittedly one of the more expensive, is the EZ Clone system, available from many online retailers including Amazon. The EZ Clone system comes in several sizes, with room for 30, 60 or 120 clones accordingly. For optimum results with the EZ Clone system, be sure to clean it thoroughly between uses and maintain a pH balance of roughly 6.0 – 6.3 for the water / nutrient blend.


The EZ Clone 30 has room for up to 30 clones and comes with a 12 gallon reservoir, so it’s a fairly sizeable setup, and the larger EZ Clone systems come with bigger reservoirs. But if you aren’t ready to invest ~ $250 – $300 in an aeroponic system like the EZ Clone setups, you can still experiment with aeroponics on an affordable scale.


Bloom Brothers Cloner Bucket


Aeroponic Systems

Knowing how to grow marijuana with Aeroponic Systems is a great skill to have.


The Bloom Brothers Cloner Bucket, for instance, comes with everything you need to get started with up to 18 clones in a compact 3.5 gallon bucket, and it costs as little as $65. Cuttings should start showing roots in 5 – 10 days, and the Bloom Bucket comes with neoprene inserts to use in lieu of net pots or other cumbersome materials, as well as a decent pump and 15ml of Clonex rooting gel to help get your clones started on the right track.


Whether you opt for a larger system or a smaller aeroponic bucket or bubbler bucket-style system, the results of aeroponic rooting and even full aeroponic growth through the vegetative and flowering cycles, can be quite rewarding. Certainly, as a method for quickly and reliably establishing robust roots, an aeroponic system seems to win hands-down over its competition.


Remember to use a good rooting gel (Clonex is far and away the most popular) in conjunction with your aeroponic system. While you can certainly get good results from an aeroponic system with no extra help, the rooting gel will speed up root production by an average of 2 – 4 days, depending on your specific circumstances.


Aeroponic Systems and Marijuana